Table of Contents
- Cloud Config File Downloads
- Introduction
- Terminology
- Setting up CJOC
- Configuration
- Client Masters
- Shared Configurations
- Shared Slaves
- Cluster Operations
- Update Centers
- Conclusion
Cloud Config File Downloads
Introduction
Welcome to the DevOps Library! This is Samantha, and today we're going to set up Cloudbees Jenkins Operations Center, or CJOC for short. If you've never heard of it, the CJOC is used for managing multiple Jenkins Masters. It makes it much easier to scale Jenkins horizontally, as it makes it possible to share build nodes between masters. You can also enforce security compliance, manage update centers, setup single sign on, and monitor the everything all from the CJOC. Sounds pretty cool huh? It is, trust us!
Terminology
Alright, let's go ahead and get started! First, let's talk about some new Jenkins terminology related to Operations Center. You'll typically have at least one Operations Center Server, ideally in HA mode. This server is a special type of Jenkins instance that acts as a central authority over your entire Jenkins environment. It's also what we'll be setting up in a few minutes.
Next, we have client masters. A client master is just a normal Jenkins master that we've joined to our Operations center cluster for management purposes. These masters can then use normal slaves, shared slaves, or a shared cloud.
Shared slaves are exactly what they sound like, slave nodes that are available for any master to use.
A shared cloud is used to spin up temporary slaves when demand exceeds what's available from the shared slaves.
Next, we have folders, which behave a bit differently than the folder's you would normally associate with Jenkins. When it comes to Operations center, folders are used for scoping the availability of resources. For example, you could have a folder with credentials, shared slaves, and a shared cloud. Each of those items would then only be available to other items within the same folder or same subfolder.
Lastly, we have Sub-licensing. Normally you have to worry about keeping each master licensed, but with CJOC, it includes the ability to generate sub-licenses for all client masters within the CJOC cluster.
Setting up CJOC
Alright, that's enough terminology for now. Let's go ahead and create our Operations Center Server! First, we'll start out with a fresh Ubuntu 14.04 server. If you'd like to cheat a bit, you can use our cloud config file HERE, which configures everything for you automatically.
If you'd like to do it by hand, the first thing that we need to do is to add all of the keys and repositories for installing Jenkins & Java. Just copy and paste the following lines:
add-apt-repository ppa:webupd8team/java -y
wget -q -O - http://nectar-downloads.cloudbees.com/jenkins-operations-center/1.625/debian/cloudbees.com.key | sudo apt-key add -
echo deb http://nectar-downloads.cloudbees.com/jenkins-operations-center/1.625/debian binary/ | sudo tee /etc/apt/sources.list.d/jenkins-oc.list
Then run an apt-get update.
Once that finishes, let's install Java by running:
apt-get install oracle-java8-installer -yAfter Java finishes installing, we're now finally ready to install Jenkins Operations center. To do so, run:
apt-get install jenkins-oc -yConfiguration
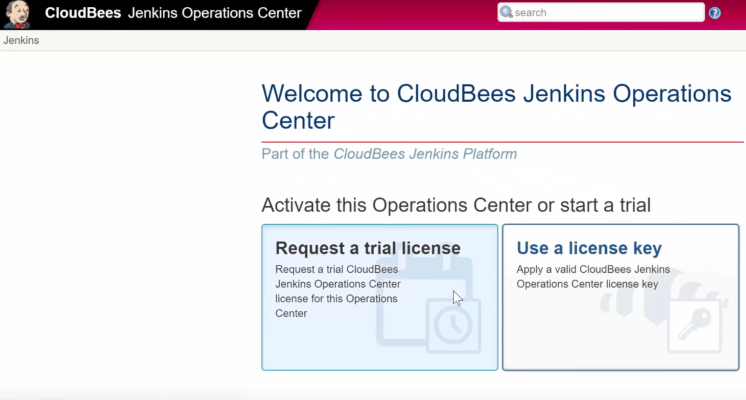
Nice job!! That's all that we needed to do to setup CJOC. Now let's open up a web browser and go to the IP address of the VM, on port 8888. You will need to sign up for a trial license if you don't have an enterprise license yet.
After licensing the server, we need to configure the Jenkins URL before doing anything else. Go to "Manage Jenkins", followed by "Configure System". You should see a line titled "Jenkins URL" near the bottom of the page. If you've set up a DNS name for the CJOC server, you can use that here, otherwise just leave it as is and click save.
Client Masters
Alright, we're finally ready to add some client masters. If you already have some masters available feel free to use them, otherwise you can use our two cloud config files below to spin up some new ones.
After the masters come up, we need to add them to Operations center. On the JCOC web interface, select "New Item". Then type in a name for the master, and select "Client Master" for the item type. On the configuration page, we'll stick with the defaults. Before we move on though, let's talk about what a few of the settings are used for.
The "On-master executors" setting is used to force a set number of executors. From a security and performance perspective, we highly recommend checking the "Enforce" box and setting this to zero, as every job should be running on slaves, not masters.
Another useful setting is the "Master Owner" configuration. This lets you specify an email address or a list of addresses that are notified anytime the master goes offline.
The licensing section is helpful is well, as you can have operations center take care of the licensing on your masters, as well as telling them to use a specific Jenkins update center, which works sort of the same way that a WSUS server works on Windows. Alright, go ahead and click save.
On the next page, type in the URL of the Jenkins master, then click "Push configuration". Within a minute or so, you'll be redirected to the master you're trying to add. Now click "Join Operations Center" to complete the process.
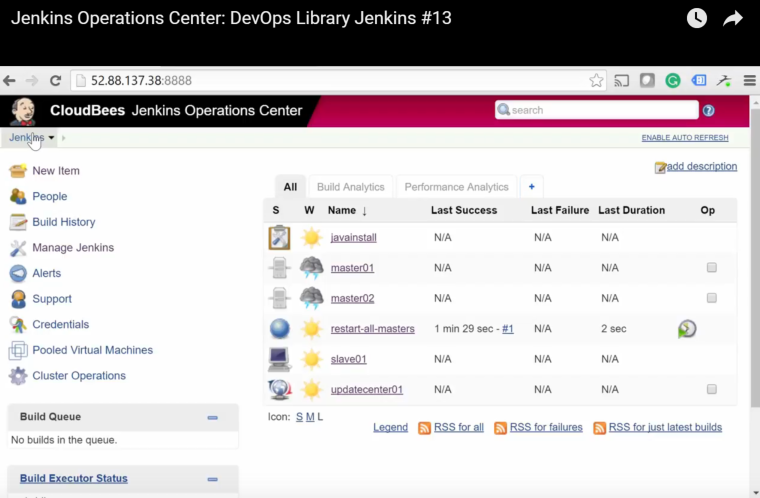
Perfect!! Go ahead and go through the same steps to add the other one. Once you're finished, the CJOC should look something like this. Great job! At this point, it's really up to you on how you configure it, but we'll run through some of the most commonly used features.
Shared Configurations
First, let's talk about "Shared Configurations". You know how on each master, there's a "Configure System" section with a ton of settings? A "Shared Configuration" is used to configure those settings once, and share them across your masters.
Let's try it out. We'll set up a shared configuration that ensures the latest version of Java is installed on all of our masters. Click "New Item", type in a name, then select "Miscellaneous Configuration Container". On the next page, click "Add Snippet". We'll go with "Tools Installation", followed by "Add Tool". Select JDK, give it a name, and select which version you'd like to use. Once you have the settings that you'd like, hit "Save".
At this point, every one of our masters will now ensure that the latest JDK is installed, pretty cool huh? If for some odd reason you have a master that should NOT share configurations, you can always opt out on its individual system config page.
Shared Slaves
Alright, next we have "Shared Slaves". Don’t worry, they’re super easy to setup, and if you’ve already set up a slave before feel free to skip ahead. Basically we just follow the same steps that we'd normally do to set up a slave, but do it from the CJOC.
Just like everything else so far, the first step is to go to “New Item”. Next, name the agent, and select “Shared Slave” as the item type. Alright, now that we’re on the configuration page, a lot of these settings are environment specific. We tend to use one executor per core, but it’s really up to you.
For the FS root, make you’ve already created the directory on your slave server. If you use our slave.yaml cloud configuration, be sure to specify /Jenkins as that’s the directory we typically use.
After you’ve added a host and credentials, click “Save”. Great job!!! We now have a slave that any of our masters can use. We do have a bit more to cover, but if you’d like to take a break to try it out go ahead!
Cluster Operations
Ok, we’re almost finished, but we have two more features we’d like to cover, Cluster Operations and the Update Center Plugin.
A “Cluster Operation” is a new item type that lets you perform maintenance on a variety of items, including client masters and update centers. They’re not nearly as complicated as they sound, but they are pretty powerful! Let’s try setting one up for restarting all of our masters. Click “New Item”, name it “Restart All Masters” and select “Cluster Operations” as the item type.
Alright, there are three important parts of an “Operation”. The first is the type of operation, which can be either “Client Master” or “Update Center”. Because the operation we’re setting up affects masters, select “Client Master”.
Secondly, we need to choose how to target the masters. We’ll select “From Operations Center Root”, that way it selects all of them. You can optionally specify a filter if you’d like to get a bit more granular than the list of target sources.
Third, we need to specify what steps the operation should actually take. For this operation, select “Restart Now”, then save the operation.
Great job!! You’ve successfully set up a cluster operation. If you’d like, you can run it now and both of our masters will be restarted immediately.
Pretty cool huh?
Update Centers
Well, we’re finally almost finished, we have one final topic to cover, Update Centers! An Update center is created the same way everything else was created, just go to New Item, name the Update center, and select “Update Center” as the job type. You’ll then need to select a plugin versioning strategy, signature provider, upstream source, and any maintenance tasks that you’d like.
The plugin versioning strategy can be set to explicit or implicit publishing. Explicit means that the update center won’t publish any versions of a plugin until the administrator specifically chooses a version, while implicit defaults to publishing the latest version of each plugin.
You can usually just leave the signature provider as is. For the upstream source we recommend selecting “Jenkins Enterprise by Cloudbees”, unless there’s a specific reason to include experimental plugins. Go ahead and hit save.
That’s it for the update center, but do note, you will have to configure the masters to point to the update center. Once that’s complete you’ll never have to worry about someone installing a plugin that hasn’t already been approved. You can do it manually, or by using the update center installer plugin.
Conclusion
Well, that was a pretty long lesson! We covered a ton of material, great job following along! We set up a Jenkins Operations Center, two masters, a shared slave, a cluster operation, and an update center, all in a single lesson!
Thank you so much for watching!
We'd like to give another shout out to Hired for sponsoring this course. If you're into DevOps, there's a pretty good chance you've had to deal with pushy recruiters and countless emails, as well as spent many hours searching for DevOps opportunities.
The reason we love using Hired is that it completely reverses this situation and puts the power back in your hands, by having companies send you interview requests that you can choose to pursue.
(They even come with upfront salary and equity!)
By having you fill out information that is specific to what you’re looking for and your individual strengths and talents, it ensures that the only companies you'll hear from will be a great fit for you. Plus, Hired is entirely free, and they’ll even give you a $2,000 bonus after you land a job, using our DevOps Library link!
We highly recommend giving them a shot, they do a fantastic job, especially for the DevOps community.