Introduction
Welcome to the DevOps Library! This is Samantha, and in this episode we’re
going to the second half of the open source Jenkins plugins on the CCJPE.
Let’s go ahead and get started!
Table of Contents
- IRC, Jabber, Skype, and Slack Plugins
- JUnit Plugin
- Matrix Project Plugin
- NodeLabel Parameter Plugin
- Parameterized Trigger Plugin
- Promoted Builds Plugin
- Radiator Plugin
- SMS Notification Plugin
- Script Security Plugin
- Conclusion
IRC, Jabber, Skype, and Slack Plugins
First up, let’s knock out all of the notification plugins. The IRC, Jabber, Skype, and Slack plugins are all very similar, in that they add build notifications to Jenkins for their respective chat clients.
While the Slack plugin isn’t on the exam, it’s our favorite here at the DevOps Library, so we’ll use it to demonstrate how these plugins work.
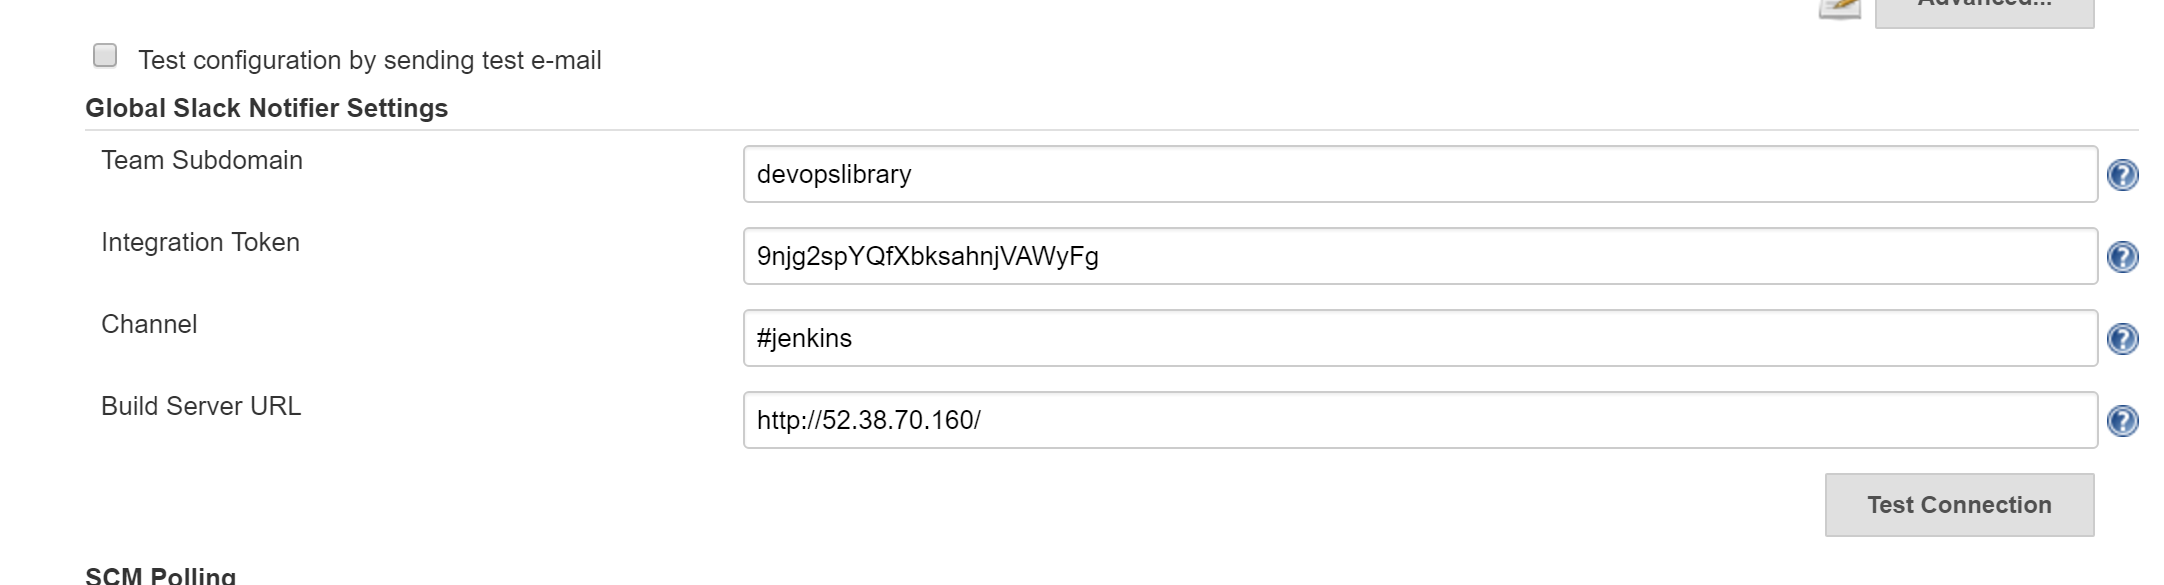
First, we need to go to “Manage Jenkins”, followed by “Configure System”.
Next, we just need to provide our team domain, an integration token generated
from the Slack website, the channel we’d like Jenkins to post to, and the URL of
our build server.
Now let’s take a look at how to configure a job to send build notifications to Slack. It’s very easy, the only thing we have to add is a post build action for “Slack Notifications”. Let’s add that now, then specify what event’s we’d like to be notified about.
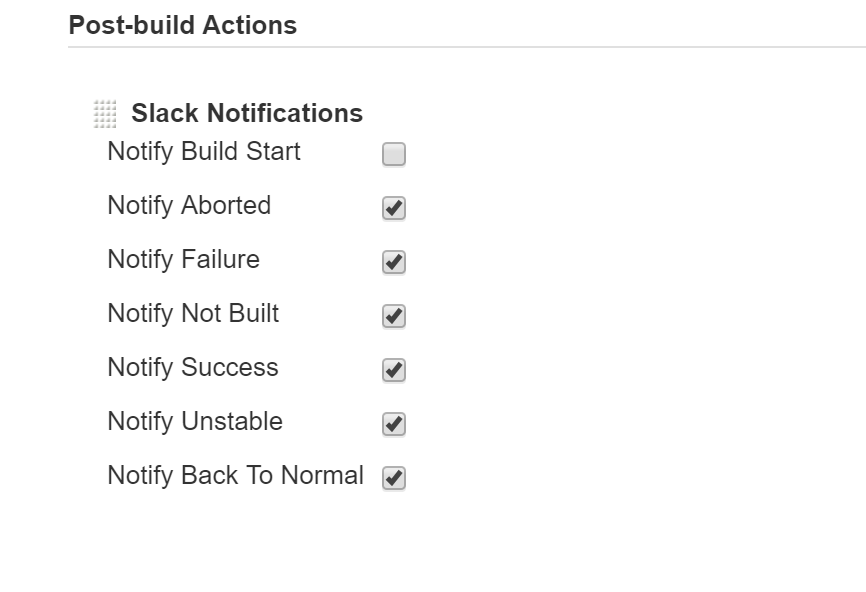
Done! Let’s go ahead and run the job, we should see an alert in Slack almost immediately. There we go! While you won’t want to use this plugin for every job, it’s very handy for notifying build teams when a job has completed, or an operations team when a deployment has finished.
JUnit Plugin
Next up we have the JUnit Plugin. If you’re not familiar with JUnit, it’s an open source tool used for unit testing. While JUnit is used specifically for Java, many other testing platforms, such as Cucumber and Selenium are also able to output test results in the JUnit XML format.
This plugin adds a Post-Build action that parses the XML, and provides an easy way to interpret the testing results within Jenkins.
Let’s take a look at our JUnit demo job. On the right, we can see how our tests have been trending, and we can even view individual test results by clicking on one of the builds.
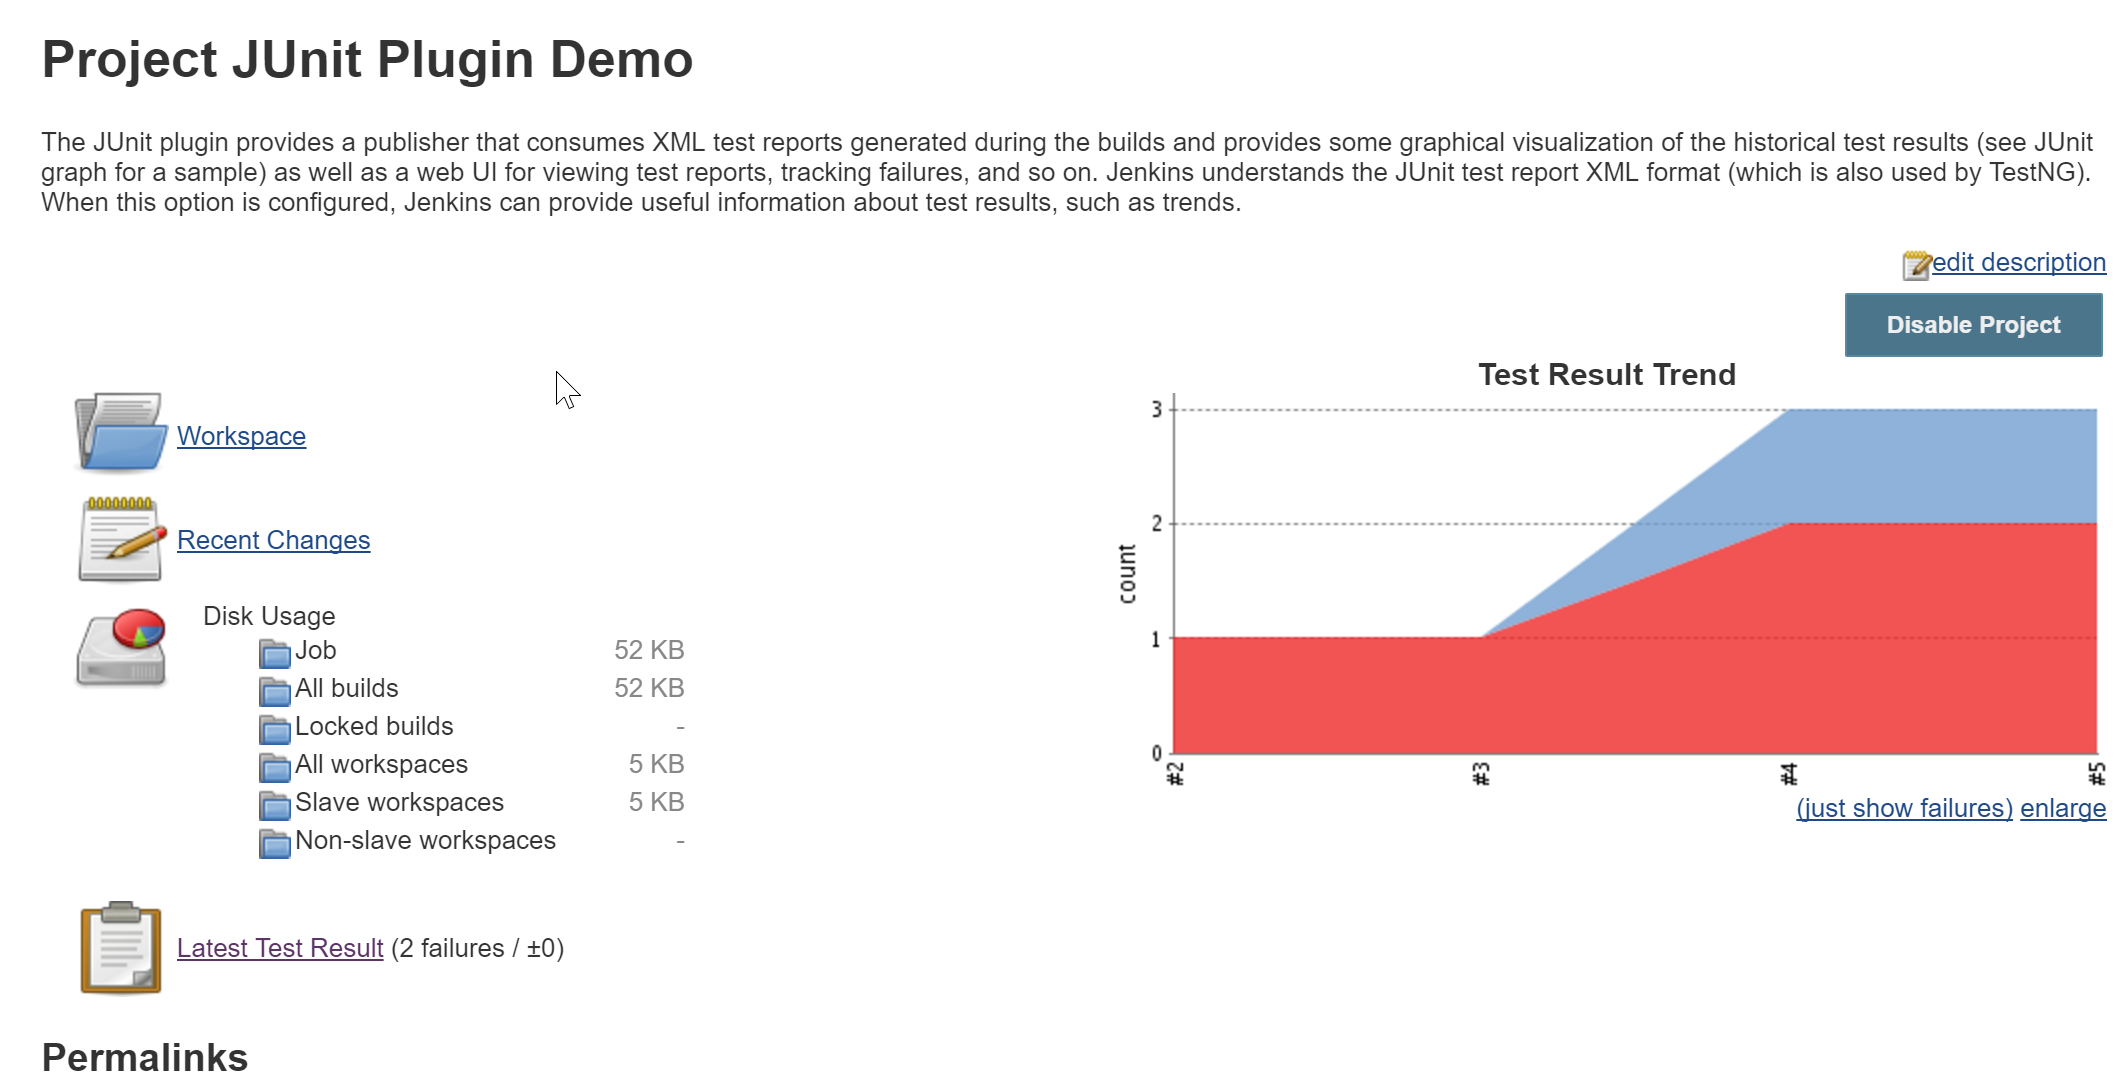
Another feature that the JUnit plugin adds is the ability for Jenkins to display yellow status balls, which are used to represent unstable builds. An unstable build is one that runs successfully, but fails one or more tests.
Matrix Project Plugin
Alright, now onto the Matrix project Plugin.
This plugin adds an entirely new type of job, called a “Multi-Configuration Project”. In order to understand when to use this type of job, imagine you need to create a bunch of different jobs that all do almost the same thing, with slightly different parameters. One option would be to several different freestyle jobs, or you could simply create one multi-configuration job.
Let’s take a look at an example. We’ll pretend that we have a web app that we’d like to test in multiple environments on a variety of web browsers. To do that, we created two axes, one for browser type and another with each of our environments listed. Then for our build step, we just created a simple echo statement to demonstrate how a multi configuration job works.
Let’s build the job. Normally, each build would only have a single status of success or failure, but for this job we have 25 status balls, one for each build that Jenkins generated! Let’s go ahead and click one of them, then view the console output… I’ll go with QA testing on Chrome.
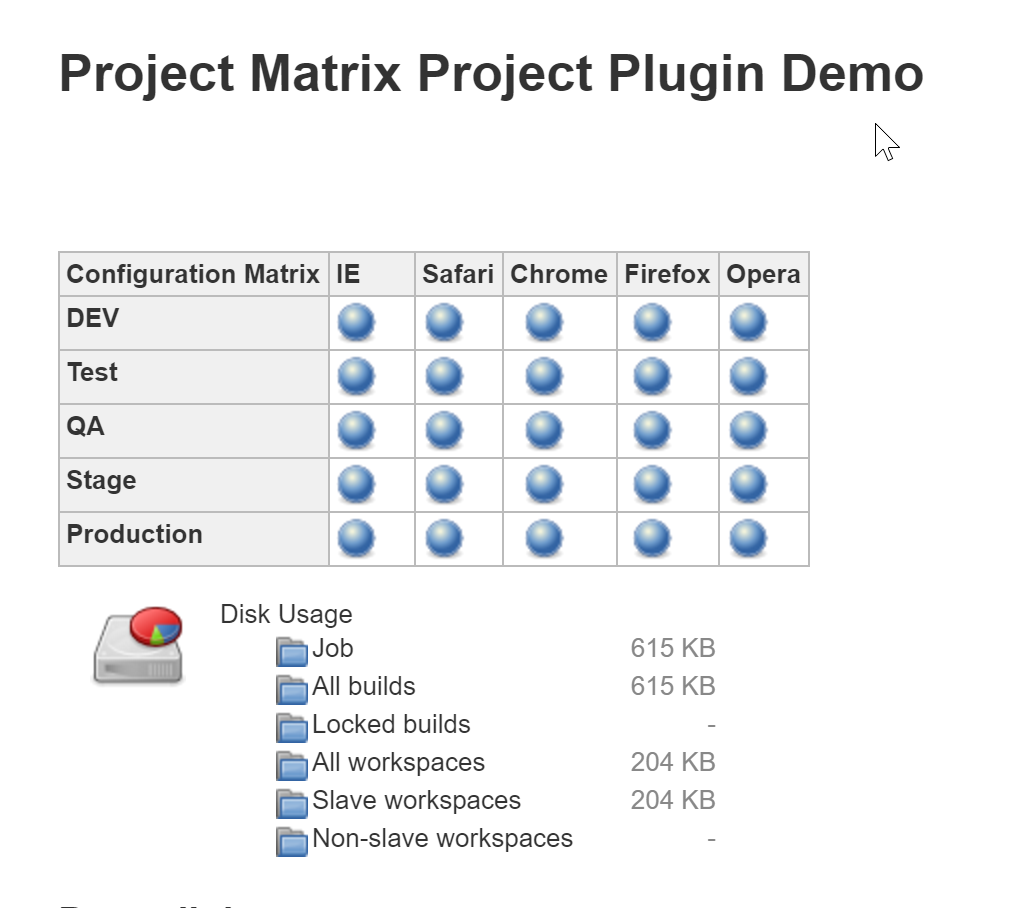
See? We were able to try every possible combination of environment and browser all from a single job!! Pretty neat huh?
For the exam, remember that the Matrix Project adds the Multi-Configuration Project job type, and also make sure you understand how many builds a multi configuration project creates. Don’t worry it’s pretty easy to remember, just take the number of items on each axes and multiply them together. If we have one axis with 5 items, and another axis with 3 items, how many builds will Jenkins create? 15! Pretty easy huh?
NodeLabel Parameter Plugin
Next up we have the NodeLabel Parameter Plugin.
This plugin adds two build parameters, both of which can be used to specify where a build should run. Let’s go ahead and try it out. Create a new free style job, then on the job configuration page, select “This build is parameterized".
Next, click “Add Parameter”, and select either “Node” or “Label”, depending on whether you’d like the user to select a node from a drop down list, or specify a label that targets one or more nodes. Let’s select “Node” this time.
For the name, put whatever you’d like, just make sure it’s clear for the user.
At this point, you can select “ALL” to make all Jenkins slaves available as
options, or you can configure the job to only allow a specific group of nodes to
be chosen. As we currently only have our master node, we’ll leave it with the
defaults and save the job.
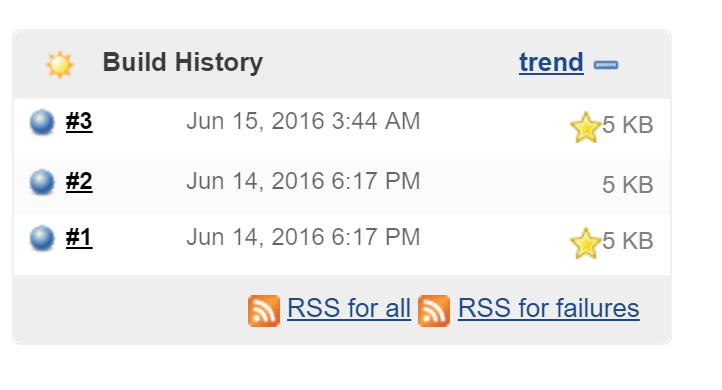
Now click “Build with Parameters”.
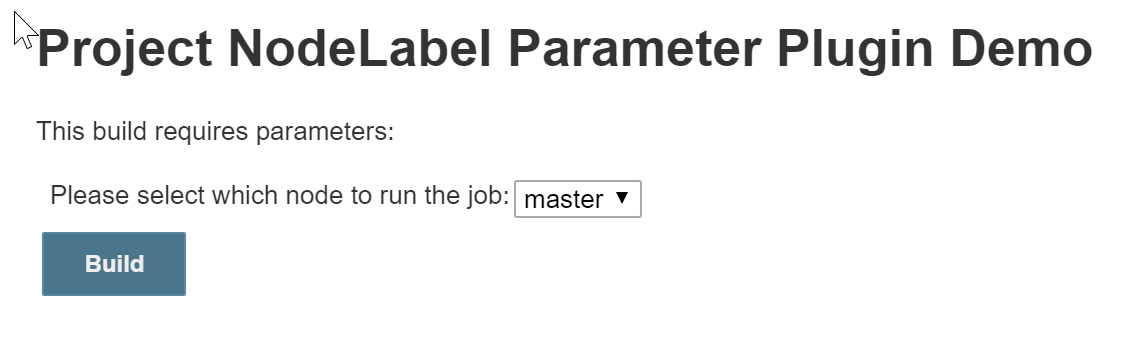
There we go! See? Anyone that runs the job can now select which node to use
for the build. If you’re wondering when you might want to use this, imagine
having a job that deploys a web application. With the NodeLabel Parameter
Plugin, we can now select which web server to deploy the application to.
Overall, it’s a pretty simple but very useful plugin.
Parameterized Trigger Plugin
Now onto the Parameterized Trigger Plugin!
This plugin is used for triggering another build job from a parametrized build job. By default, Jenkins has the ability to trigger other jobs as part of a build step or a post build action.
However, this plugin adds the ability to pass parameters from the upstream job to the downstream one that’s being triggered.
If you’re wondering when you’d want to do this, let’s imagine we have a
parameterized job for selecting an application to deploy. We also have a QA
job that requires the name an application in order to know which tests to run.
By using the parameterized trigger plugin, we can automatically trigger the QA
job at the end of the deployment job, with all of the parameters passed in.

Please NOTE! On the Jenkins CCJPE exam, DON’T confuse the “Parameterized
Trigger Plugin” with the “Parameterized Remote Trigger Plugin”.
The parameterized remote trigger plugin is used to trigger builds on remote
Jenkins masters. While it’s not listed on the study guide, don’t be surprised
if a question comes up asking about it!
Promoted Builds Plugin
Next we have the Promoted Builds Plugin!
If you’re following along in the study guide, you might be wondering why we skipped the Pipeline Plugin.
The reason is, we’re planning on devoting an entire lesson to using it, as it makes up a sizeable portion of the exam, and we want to make sure we spend enough time covering it.
Anyway, back to the promoted builds plugin. This plugin adds the concept of “promotion” to Jenkins. A “promoted” build is a successful build that’s passed additional extra criteria, such as downstream automated testing or even manual promotion. You can even have multiple levels of promotion, such as requiring a build to be promoted by a Dev, QA, and DBA before it can be deployed to production.
For the exam don’t worry about knowing every detail about promoting builds, just remember that it’s useful for setting builds apart that have met additional criteria, whether that’s by a team or automatic promotion is up to you.
Radiator Plugin
Now it’s time for the Radiator Plugin!
This plugin is used for creating “Radiator” views. These are perfect for displaying on a large screen next to development teams, as it makes it very easy to see if any jobs are failing.
In our example environment, we do have two radiator views configured, let’s take a look at them. The first displays what you’ll see if no builds are failing, while we’ve added a failing job to the second view.
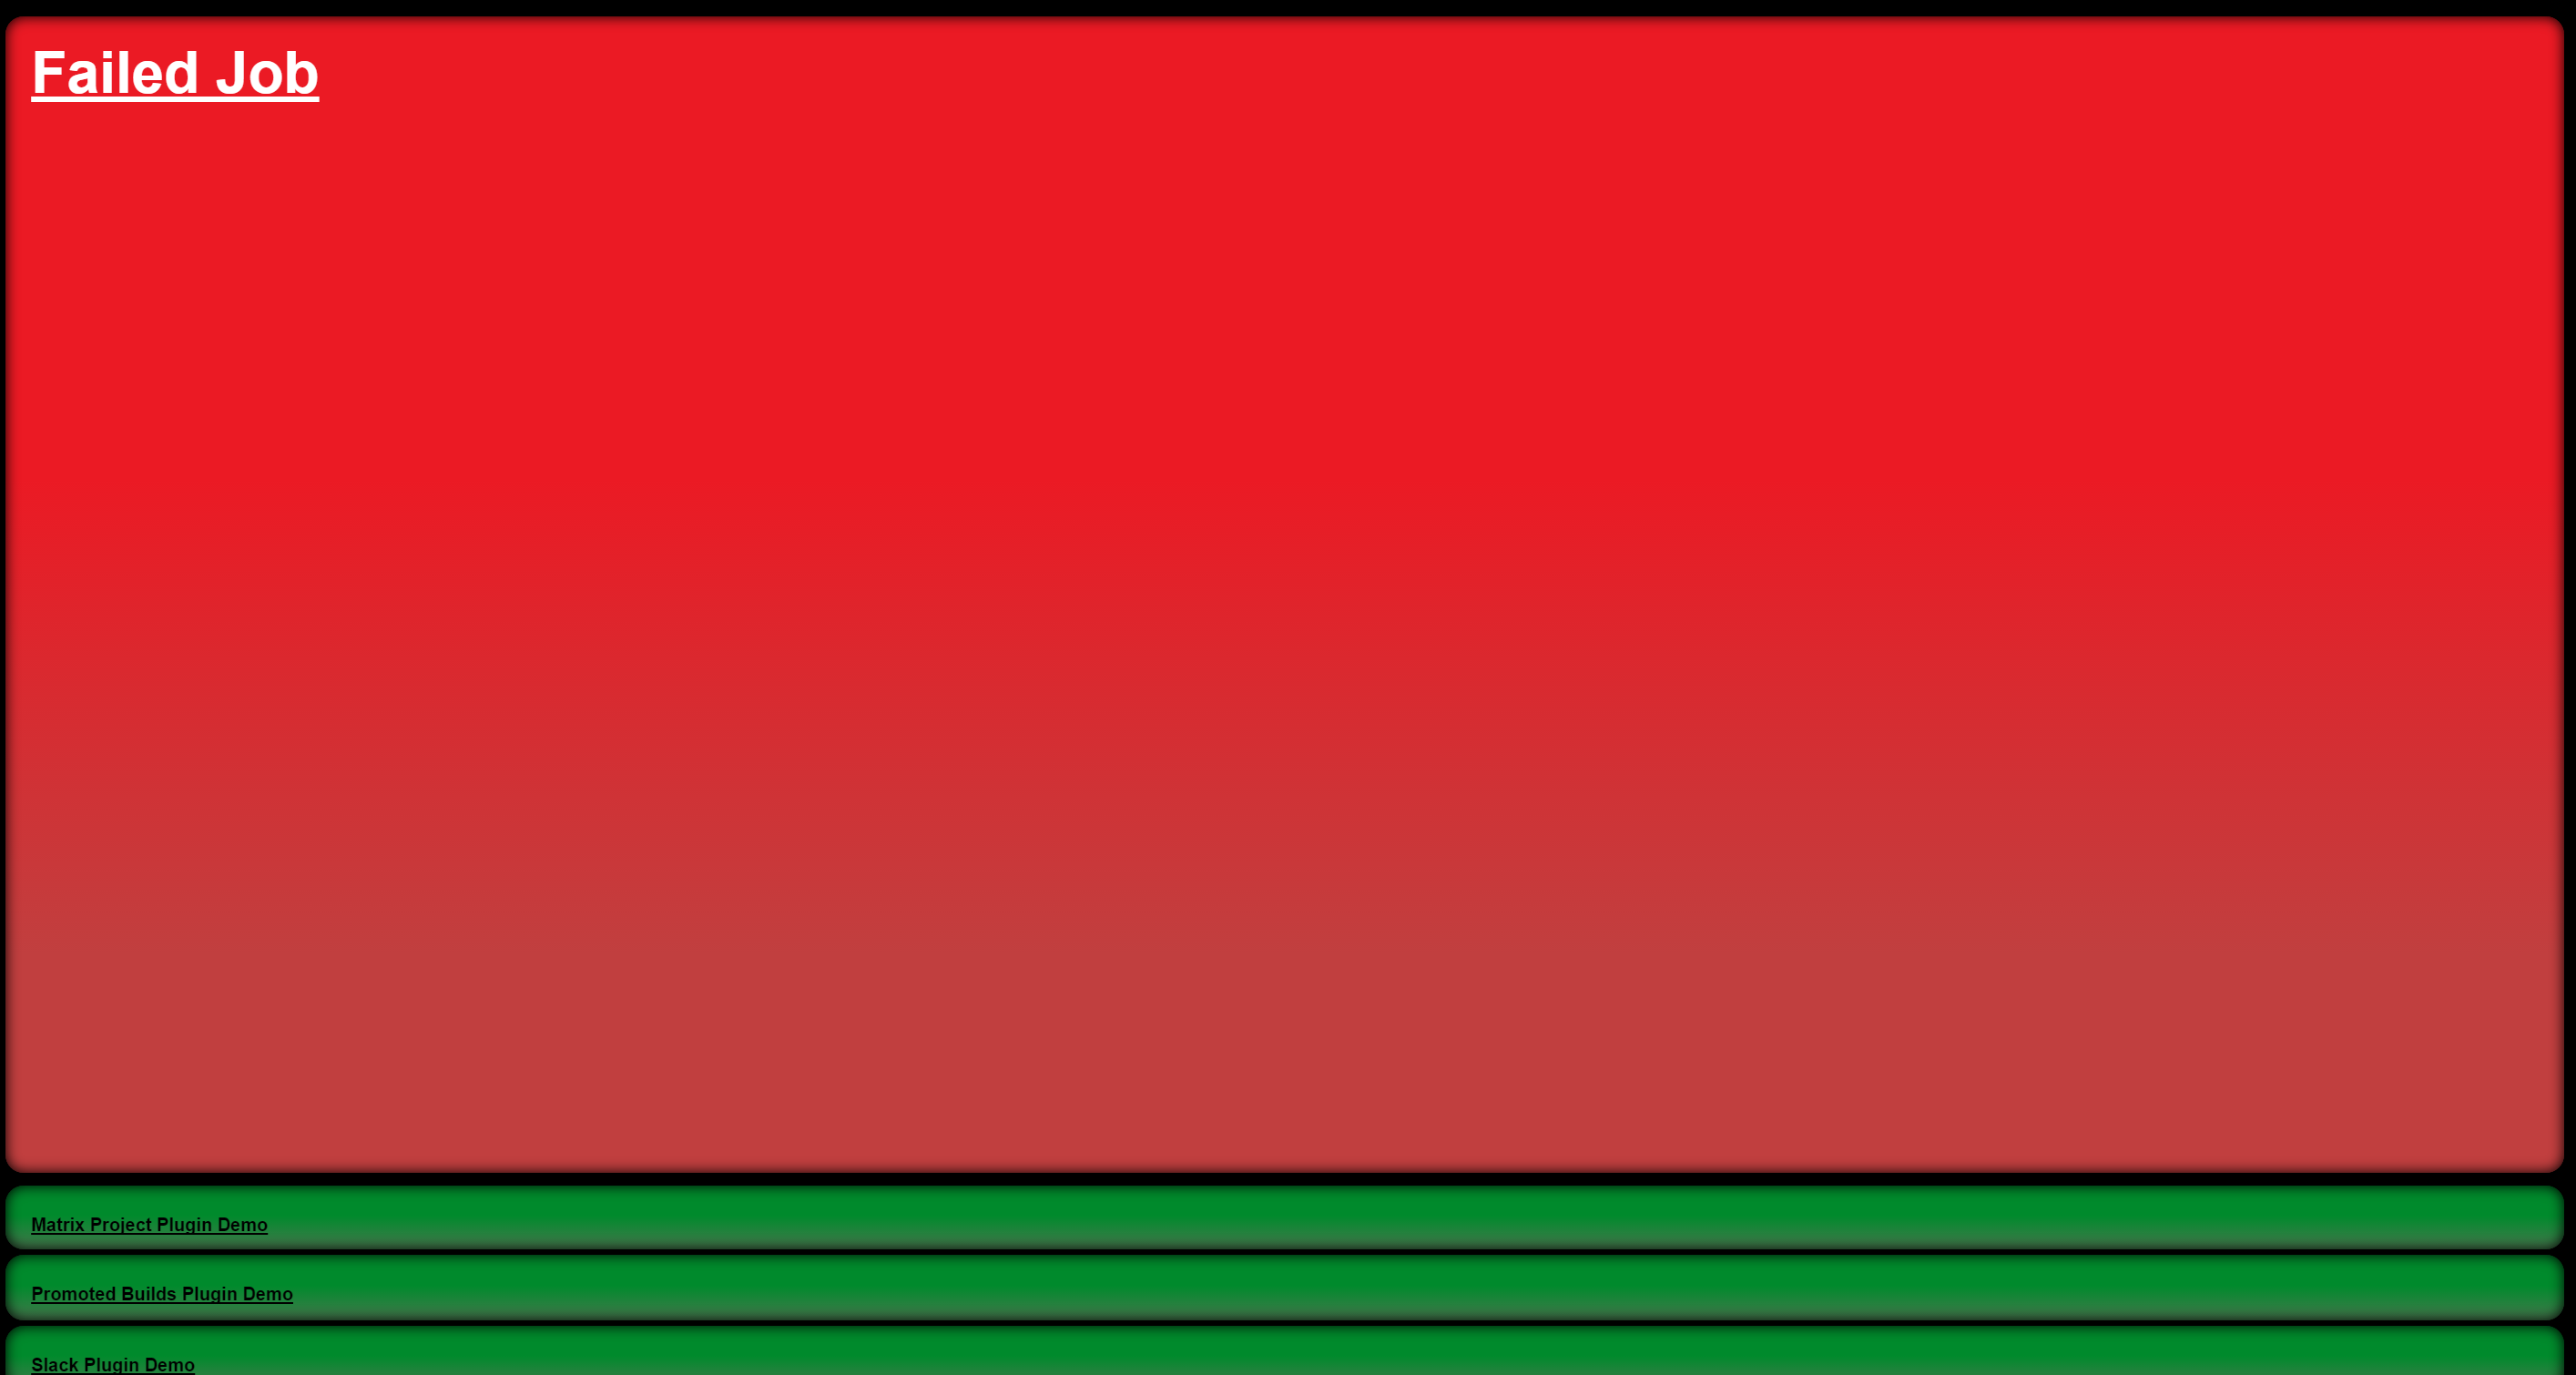
As you can see, it’s VERY clear when something is having a problem, and that’s the benefit of using this plugin.
One of the things you’ll want to remember for the exam is that a radiator ISN’T used to display a lot of information about each build or job, it’s ONLY used for displaying success or failure.
SMS Notification Plugin
Next we have the SMS Notification Plugin.
This plugin adds a post build action for sending out notifications via SMS text messages. While some teams may find this useful, we find that using something like PagerDuty or VictorOps works much better for notifying team members about something urgent.
Script Security Plugin
Now onto the last plugin of our lesson, the Script Security Plugin.
This plugin can be EXTREMELY useful for large Jenkins environments if you allow users to create their own jobs.
Let’s start out by imagining a scenario where everyone has full administrator
access in Jenkins. One user decides to make a job, and as part of a build step
decides to add rm -rf /.
Assuming the job is kicked off on a Linux node, that user just successfully destroyed one of our slaves, or possibly even the master if that’s where the job is built.
Now let’s imagine a much happier scenario, this time with the script security plugin enabled, and only our trusted users are admins. Once again, our problem user tries to create a job with a destructive build step, this time though, the script can’t run until an administrator approves the script. If the script is approved, it’ll be added to a preapproved list so that other users can use it immediately, but this time one of our admins rejects it, preventing anything bad from happening.
If approving each script sounds too time consuming, the script security plugin also adds a feature called “Groovy Sandboxing”. While this isn’t too helpful for our shell and PowerShell scripts, it does provide a limited execution environment for users to safely execute whatever groovy code they’d like, provided the commands they’d like to use are whitelisted. Overall, it just depends on your environment and what level of access you want to provide your users.
Conclusion
Well we’ve finally finished covering all of the open source Jenkins plugins with the exception of the Pipeline plugin. Don’t worry we’ll cover that soon, and great job so far following along, we know learning about plugins can get pretty boring.
Thanks again, we’ll see you again soon.