Table of Contents
- Cloud Config File Downloads
- Introduction
- 3 A's of Security
- Implementing Security in Jenkins
- Authorization Strategies
- Role Based Access Strategy
- New Terminology
- Real World Use Case
- Granting Access to a Folder
- Conclusion
Cloud Config File Downloads
Introduction
Welcome to the DevOps Library, this is Samantha, and in today's lesson we're going to talk about securing Jenkins, including the difference between authentication and authorization, how to set up different types of security realms, using AD for authentication, and even how to use the Jenkins Role-based access plugin!
3 A's of Security
Alright, let's begin by talking about the three "A's" of security: authentication, authorization, and auditing.
- Authentication is simply the process of proving that someone is who they say they are.
- Authorization is the process of determining what someone is allowed to do after they've authenticated.
- Auditing is the process of creating a record of everything that happens, along with who did what.
In this lesson we're going to focus mainly on configuring authentication and authorization.
Implementing Security in Jenkins
Let's go ahead and see how to implement these concepts within Jenkins. Pull up a Jenkins master, then head to "Manage Jenkins", followed by "Configure Global Security". Alright, first, we'll want to enable security, so go ahead and check the box if it isn't already.
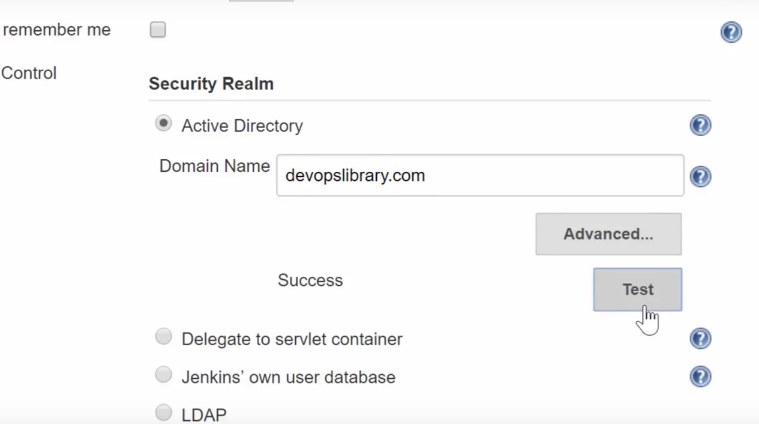
Next, we need to choose a security realm, which is used for the authentication step, so verifying the user, their password, and what group they belong to is all part of it. As most companies use Active Directory, we'll use that and go ahead and type our Domain Name in. Make sure you've set up DNS so that your Jenkins master can resolve the domain, then go ahead and click "Test" to verify that the connection worked.
Alright, now before we move on, make sure you log into a domain account (or whatever realm you chose), then return back to the global security page.
Next, it's time to decide on which authorization strategy we'd like to use.
Authorization Strategies
- Anyone can do anything is pretty self explanatory.
- Legacy mode isn't much more useful, as it only gives you two levels of access, "admin" which has full control, and everyone else (including anonymous users) have read only.
- Logged-in users can do anything is only useful if you'd like everyone to have auditable admin access, and probably isn't very useful outside of smaller teams.
- Matrix-based security is about the best you can get in the open source edition of Jenkins, as it really lets you get pretty granular on the permissions. Let's go ahead and take a look at it real quick. See this really long line with all the checkboxes? That's how we assign permissions to each user. While it is extremely granular, you can't assign different rights to different jobs.
- The Project-based Matrix Authorization Strategy is exactly the same, as the normal matrix-based option, but lets you specify different permissions on each job's configuration page. You can certainly get by for awhile using this option, but it does become pretty cumbersome as there's no way to manage groups of projects.
- Lastly we have the Role-Based Matrix Authorization Strategy, which is unfortunately only available in the enterprise version of Jenkins, but it's definitely the most flexible and easiest to manage as your team scales.
Role Based Access Strategy
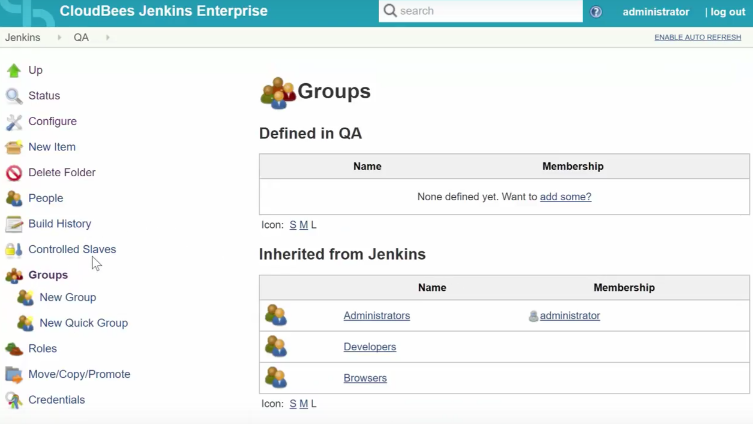
For this lesson, let's go with "Role-Based", as it can do everything the other models can do and more, and it's also heavily targeted on the Jenkins certification exams. You'll notice that when you select it, an "Import Strategy" dropdown appears. Change it to "Typical Initial Setup", then hit "Save". If you didn't see the initial setup dropdown, make sure you're logged in otherwise it won't be available. It automatically creates a group of administrators, of which initially you'll be the only member, as well as a "Developers" group, and "Browsers" group. Speaking of groups, check out the menu on the side. We have two new items, one for managing "Groups", and another for "Roles".
New Terminology
Before we keep going, let's cover some new terminology.
- A local group refers to a set of users, external groups, or even other local groups, and are defined by the Jenkins RBAC plugin that we're now using. To manage them, click the "Groups" link on the left. Here you can see our three new groups created by the initial configuration.
- An external group also refers to a group of users, but one that is defined outside of Jenkins, like an Active Directory Group.
- A permission is the right to do something, such as starting a job or creating a new project.
- A role is simply a collection of permissions, which makes them MUCH easier to manage. Let's check them out real quick, go to "Manage Jenkins", followed by "Manage Roles". On the left side of the table, you can see the names of our roles, and on the right we can assign permissions to each of them. See the little green hat by "anonymous" and "authenticated"? That's because those two roles are built into Jenkins, so you won't be able to delete them. The rest were all created by the initial setup wizard, so you can do whatever you'd like with them.
- Lastly, we have role filters, which are used at the job level to prevent roles from being propagated. As an example, let's take our "Browse" group, whose members have read access to everything, and create a job that they can't see. To do so, click the job, go to "Roles", followed by "Filter", and set "Require Explicit Assignment" on the "browse" role. Pretty useful huh?
Real World Use Case
Well that's enough new terminology for now, let's try out an actual real world use case. Pretend we have a QA team that need to be able to create, configure, and build any job that they'd like. However, we also want to ensure that they're not able to access anything outside of the jobs that they create for QA purposes. Don't worry, it's really easy.
First, hop on the domain controller that Jenkins is using for authentication. Once there, open up Active Directory and add a QA user, we'll name ours QAUser01. Next, we need to create a security group, let's go with Jenkins-QA. Now add QAUser01 to the Jenkins-QA group, then switch back to Jenkins.
Alright, let's log out and try logging back in with our QAUser01 account. Oops! While we were able to authenticate ok, our QA User isn't authorized to do anything yet. Let's switch back to the admin account.
Ok, go to "Manage Jenkins", followed by "Manage Roles". On this page, click the checkbox for "Overall Read" access for authenticated users, then hit save. We're giving that to every logged in user as it's the absolute bare minimum required to successfully open the Jenkins dashboard without an error. Go ahead and head back to the main Jenkins Dashboard, that way we can create a safe place for our QA team.
Granting Access to a Folder
Thankfully, the RBAC plugin combines easily with the "Folders" plugin, so we'll create a "QA" folder which we'll then give full access to the QA team to use. After creating the folder, select it, then go to "Groups" on the left side of the page. Next, click "New Quick Group", name it QA Team, and choose "administrator" for the role, then click "Ok.". On the next page, click "Add user/group". Remember that external group we just added in Active Directory? Let's go ahead and type it in here, that way our local Jenkins Group knows which group of users in AD to provide access to, then hit Ok.
Perfect! Log back in as QAUser01 and check it out. Great job!!! We were able to successfully set up a new external group in Active Directory, a new local group on Jenkins, and our QA team is now able to do whatever they'd like without being able to mess up any other team's jobs in Jenkins.
Conclusion
That’s it for our lesson on Jenkins Security, thank you for watching! We’d like to give another shout out to Hired for sponsoring this course. If you’re into DevOps, there’s a pretty good chance you’ve had to deal with pushy recruiters and countless emails, as well as spent many hours searching for DevOps opportunities.
The reason we love using Hired is that it completely reverses this situation and puts the power back in your hands, by having companies send you interview requests that you can choose to pursue. (They even come with upfront salary and equity!)
By having you fill out information that is specific to what you’re looking for and your individual strengths and talents, it ensures that the only companies you’ll hear from will be a great fit for you. Plus, Hired is entirely free, and they’ll even give you a $2,000 bonus after you land a job, using our DevOps Library link!
We highly recommend giving them a shot, they do a fantastic job, especially for the DevOps community.
If you like our videos, please subscribe to our Youtube channel! If you love them and want to help support us, visit patreon.com/devopslibrary, we’ll even list you on our high scores at the end of each video. Thanks again, we'll see you again soon!